Renogy ONE Core Monitor Installation, Testing, & Review
Calling all solar energy tracking and home automation nerds, wannabees, and anyone who wants to simplify their off-grid, solar, energy management!
The stylish Renogy ONE Core with HD touch screen is an all in one monitor for any off-grid energy system. There is a whole lot packed into this 4” device that fits into the palm of your hand – it’s a real-time solar energy monitoring system, remote battery monitor, and offers smart home automation. And, for RVers in a single vehicle (i.e., vans, truck campers, or motorhomes), you can simplify the processing of leveling with the new RV leveling feature in real time!
In this blog we’ve got 2 videos which cover installation, set up, connection, and even programming for both the Renogy ONE Core & Smart Accessories. Be sure to check them out.

How Does the Renogy ONE Core Work
The Renogy ONE Core combines all of the tracking and performance data of multiple components (i.e., batteries, charge controller, inverter, smart battery charger, DC to DC charger) into one compact unit.
The monitor connects wirelessly through either built-in Bluetooth (when combined with newer Renogy components), via BT modules (with older Renogy components), or even hardwired with an ethernet cable if you prefer. It supports Bluetooth Mesh, which will provide better Bluetooth performance when it is connected to devices that also support Bluetooth Mesh, for example, the Battery Shunt 300 – a device that will allow AGM and Gel batteries to seamlessly integrate with the Renogy ONE Core, just like Renogy’s Smart Lithium Iron Phosphate (LFP) batteries already do. So, if you haven’t yet upgraded to LFP batteries, this device will work with your existing battery bank!
Adding Smart Home Automation Accessories allow you to remotely turn on/off AC or DC appliances, make the lights switch on at dark or when you open a door, the coffee maker to start at a specified time, and even sound an alarm (and/or send a notification to your phone) if someone unexpectedly enters your home or RV.
With the Core connected to WiFi, you can use the DC Home app on your smartphone to remotely connect to the Core. With this connection in place, you can monitor and automate everything wherever you happen to be (cell signal required).
With an optional annual subscription, you can also track historical data, forecast your solar yield, monitor multiple Renogy ONE devices, and more. It’s like an RV battery monitor on steroids!
How Does the Renogy ONE M1 Compare to the Renogy ONE Core
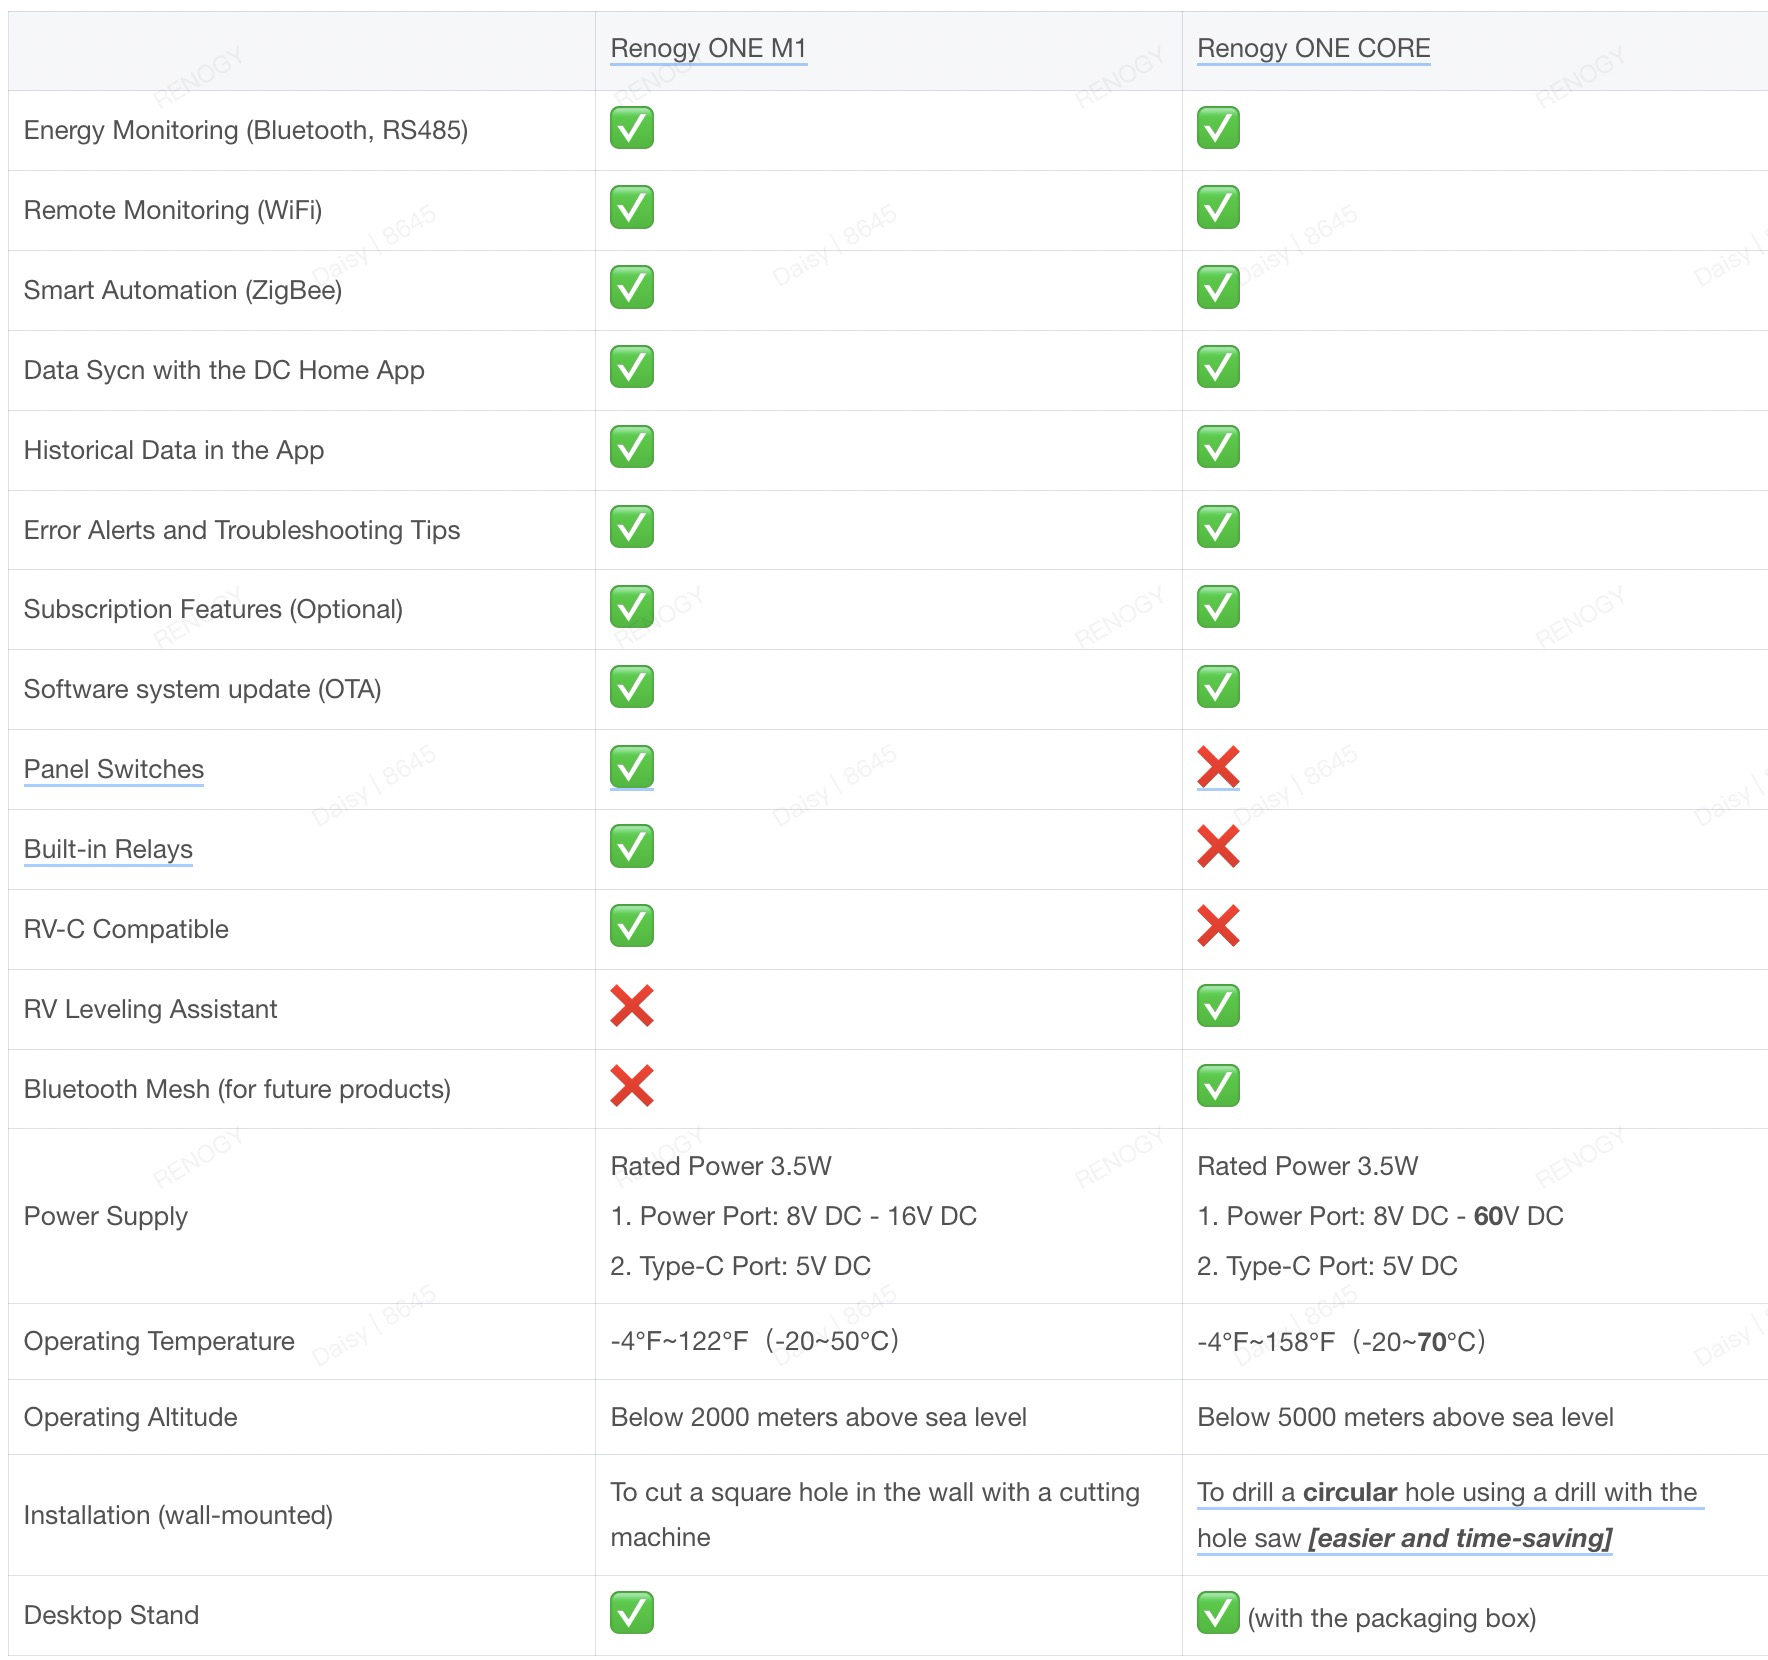
When comparing the Renogy ONE M1 and Renogy ONE Core models, we’ve found that the Core model is smaller with a stylish design, easier to install, more user friendly when adding and programming devices, and includes the new RV leveling feature. The new design eliminates the physical switches & relays, instead offering ZigBee smart home automation accessories that work wirelessly with the Core. This reduces the wiring headache of pulling wires from various appliances through the monitor. Check out the comparison chart below to learn more:

Note: The M1 is not compatible with the Battery Shunt 300.
Do I Need a Subscription Plan to Use the Renogy ONE Core
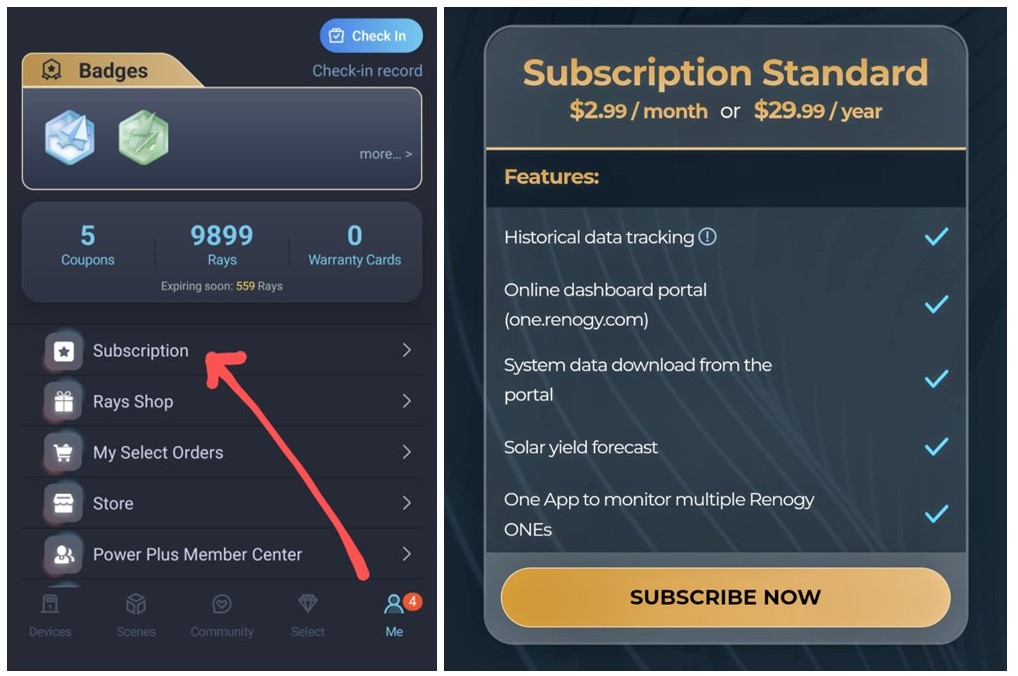
No. If you are seeking to simply monitor your devices in real-time, use the RV leveling feature, and/or use the smart home accessories, you do not need to buy a plan. But, if you want to nerd out a bit more and do historical data tracking, solar yield forecasting, monitor multiple Renogy ONE devices, use the online dashboard portal, and more, you will need to activate your “Subscription Standard” via the DC Home app (find the “Me” tab at the lower right of the screen to find the subscription option).

How Do the Smart Home Accessories Work?

A lot of energy and money gets wasted each day by leaving appliances running at home when you are away, but an energy monitoring system combined with smart home automation accessories can help you become more energy efficient.
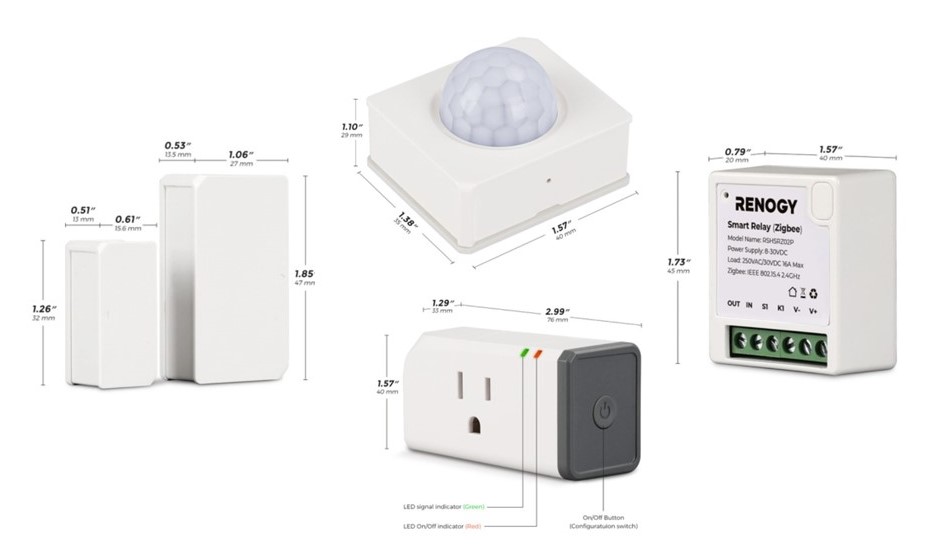
With the Smart Plug, you can program and automate 120V AC appliances in your home or RV by connecting each appliance you want to automate to a Smart Plug. For instance, if you want to turn on a fan or lamp just before you get home, you can program the Core to do this for you. Conversely, if you are coming home later than expected, you can dismiss this program using the DC Home app. Or, if you leave an appliance running, then find that your solar yield for the day was less than expected and don’t want to unnecessarily deplete your batteries, you can use the DC Home app to turn off the appliance from afar.
Adding the Smart Relay to your system allows for even more programmable home automation control. The relay can accommodate up to 250V AC or 30V DC appliances (16A max). For instance, if you want a light to turn on when you open your door, the Smart Relay (when combined with the Door & Window Sensor) can be programmed to automatically do this task.
By connecting these smart accessories and programming them to fit your daily routine for off-grid living, you will have more energy control – saving you money and extending the life of your batteries.
If you live alone or want the added security of knowing if someone has entered your home or RV while you are away, add a Motion Sensor that you can program to send you an alert and/or sound an alarm when any unexpected movement is detected within your monitoring area. Additionally, with the Door & Window Sensor installed, you can program it to sound an alarm and/or receive an alert when a door or window is opened unexpectedly.
How To Install the Renogy ONE Core
While it seems space age, this device is quite easy to install and is designed to work with both Renogy and non-Renogy components. If you have a Renogy lithium battery with built-in Bluetooth (e.g. 100Ah 12V LiFePO4 PRO Battery) OR a standard 12V 100Ah Lithium Iron Phosphate Battery with an attached BT-2 module, the Core will connect seamlessly. As an alternative, you can use the provided ethernet communication cables to hardwire your components to the monitor. If you have not yet invested in lithium batteries or are using non-Renogy batteries, the new Battery Shunt 300 will allow you to integrate the Core with any AGM or Gel batteries.
The Quick Guide is very clearly written and walks you through various installation configurations, depending on which components you already have or are planning to purchase.
How to Set-Up & Program the Energy Management System
Once you’ve chosen the wiring configuration that works with your system, simply connect the Renogy ONE Core to a 8V-60V DC power supply (e.g., fuse box or via a USB-C outlet), then mount it on a wall within 50 feet of your components so that the Bluetooth signal is strong enough. It comes with a 15 foot cord which can be lengthened, if necessary, with a little handy work. As mentioned above, if you have AGM or Gel batteries, you’ll need to add a Smart Shunt (coming soon) between the negative terminal on the battery and the negative bus bar for the Core to work with non-Lithium batteries.
Using the Renogy ONE Core “wizard,” download (or update) the Renogy DC Home appon your smartphone. Follow the steps provided by the wizard to add your devices and you’ll be monitoring your energy data immediately! Once you’ve done this, you will be able to control the Renogy ONE Core from wherever you are, provided that you have a WiFi signal for the Core and mobile signal on your phone. Note: If you use a hotspot on your phone for your remote Wi-Fi, you may need to switch on “Extend Compatibility” on your smartphone for the Renogy ONE to be able to connect with it. This function may be found under your hotspot settings.
If you add the (optional) smart home automation accessories described above (motion sensor, door & window sensor, smart plug, smart relay), a few additional steps are required to set-up the Scenes. The Renogy ONE Core wizard will walk you through this process when you choose “Add Devices” from the Tools screen. Be sure to see our video which details the installation and programming scenes for the smart accessories.
So whether your home is stationary or rolls like ours does, this little smart energy management device can help you keep tabs on the components within your solar powered system, help you become more energy efficient, allow you to automate or remotely turn on/off some appliances, and even make your home more safe and secure!

Shari Galiardi & David Hutchison have turned their higher education backgrounds, desire for life-long learning, and thirst for adventure travel into writing, photography, video production, and public speaking tours from coast to coast. Known to their friends as simply Shari & Hutch, you can learn more about their full-time, solar-powered adventures on their website at freedominacan.com. Or, follow them on Facebook, Instagram, and YouTube as “Freedom in a Can, LLC.


