
")
How to Install Solar Panels (2024 Guide)
Many homeowners have started adopting the habit of installimg solar panels on their houses as a way of saving money and conserving energy. Going solar has become quite sensible given that the cost for a unit has dropped dramatically alongside other tax reliefs and benefits. Once mounted, such photovoltaic arrays can save you hundreds in utility bills every month while also increasing your property value. This article will take you through each step involved in installing residential solar PV systems.
Assessing Your Home's Solar Potential
Determining if your house is an adequate platform for solar photovoltaic installation is the first move to a solar home. Take into account these vital factors:
Roof Size and Layout
Preferably, at least 100 square feet of the roof should be unobstructed facing south, southeast, or southwest. Flat or slightly sloping roofs are also perfect when they have slanting panel frames installed on them. It does not matter if you have enough space; rather you need open contiguous areas with no multiple roof levels, chimneys, vents and other obstructions that could cause shades.
Sun Exposure
Sunlight exposure should be good for a minimum of five to six hours every day throughout the year. Use a toolkit for solar energy or smartphone application to determine shade patterns over time. Shading by neighbouring trees or buildings can reduce solar energy output substantially.
Energy Usage
Consider the annual utility bill to calculate the average daily electricity usage that will allow you to figure out how many panels are required for optimal savings. This is important because it helps in planning; families with high power consumption need more solar panels as compared to those who consume moderately.
Roof Condition
It is essential to make sure that your roof is not too old such that it can serve for at least a decade before thinking of installing any solar system. Therefore, you should inspect all aged roofs and determine if they can support extra pounds from these systems or not.
Choosing Solar Equipment
Once you have an idea about the size of the system that suits your needs, it is time to choose which solar parts to buy. Here are some key considerations when selecting equipment:
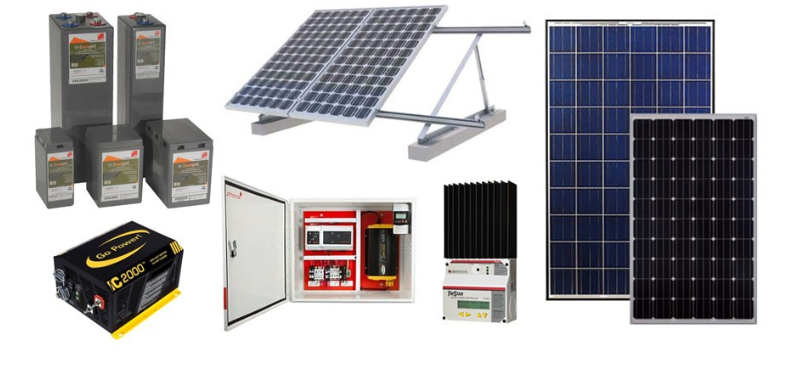
Solar Panels
Panels take in sunlight and convert it into DC electricity. The two most popular types are monocrystalline and polycrystalline silicon panels. Monocrystalline panels are slightly more efficient but also more expensive than polycrystalline ones which are less efficient but cheaper.
Inverters
Inverters change the DC output into AC power used by homes or businesses on-grid connected PV systems. Microinverters cost more but work very efficiently because they’re placed on each panel while central (or string) inverters provide a cheaper solution though can fail completely.
Racking and Mounting
Aluminum or galvanized steel racks secure panels onto rooftops or ground mounts where necessary. Racks must be able to withstand wind loads, heavy snowfall as well as movement over time.
Wiring and Connectors
Copper wiring should be used with conduit for protection against weather conditions such as rain or heat damage while connectors need to be rated accordingly too so they don’t deteriorate quickly due exposure to sunrays etc. Always use correct wire gauge size to minimize voltage drop along required distances within any given circuitry.
Charge Controller and Batteries
Charge controllers regulate flow of current going into batteries of an off-grid solar system during charging process whereas deep-cycle lead-acid batteries store energy generated by PV modules for use at night or during cloudy days. Size battery bank based on anticipated consumption levels over desired period(s).
Safety Gear
Disconnects, overcurrent devices and grounding equipment are necessary for any PV system to function safely. Don’t forget these essential components when planning your setup.
Tools and Components to Use for Installation
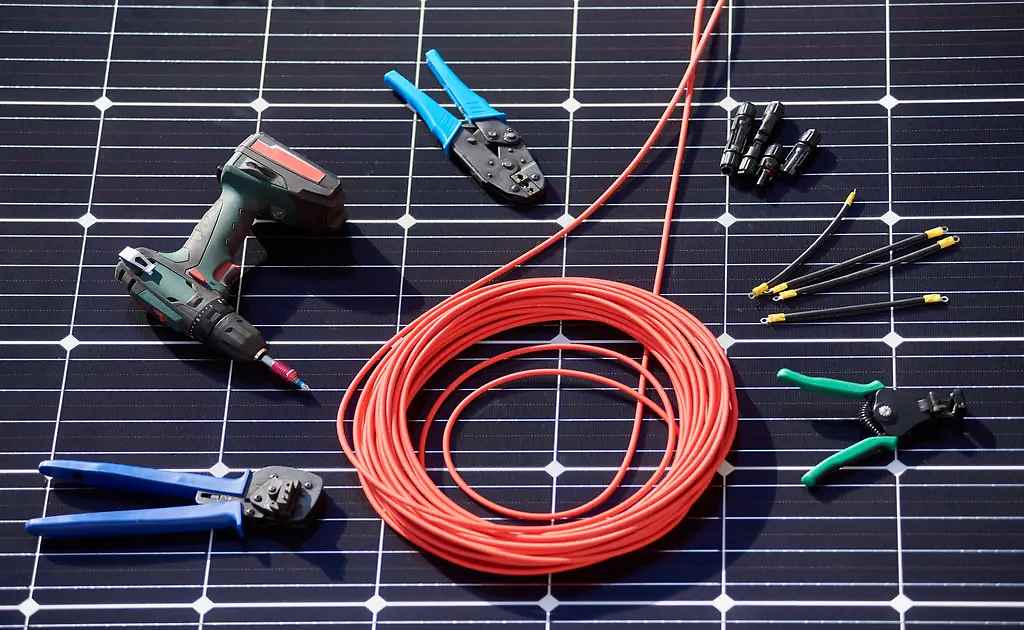
Installing solar panels is an involved process that requires gathering the right tools and components. Having these items on hand will make the installation smoother. Here are some of the essentials:
- Safety gear: Work gloves, eye protection, harness for roof work
- Electrical supplies: Wiring, conduit, connectors, junction boxes, overcurrent devices, disconnects
- Mounting hardware: Lag bolts, flashing, stand-offs, clamps tailored for your racking system
- Hand tools: Drills, drivers, wrenches, wire strippers, voltmeter, stud finder
- Leveling tools: Laser level, bubble level, digital protractor
- Lifting equipment: Rope, pulleys, boom lift for raising panels and heavy equipment
- Racking and rails: Assembled racking system and manufacturer recommended mounts
- Weather sealing: Caulk, tape, grounding washers
Having all the necessary materials on site will minimize delays and allow you to safely install components per code standards. Don't improvise hardware or electrical parts. Purchase components designed for solar applications.
Planning the Installation
Careful planning is crucial when installing a solar PV system. Follow these guidelines:
- Research local building codes and permit requirements. Most solar installations require an electrical and/or building permit.
- Determine if your utility requires an interconnection agreement to connect your solar system to their grid. Contact them early in the process.
- Decide between a DIY or professional install. Solar involves electrical work on rooftops, only attempt DIY if you have experience.
- Hire a reputable, licensed solar contractor if using professionals. Verify they have an electrician on staff.
- Have the installer provide a detailed plan with panel placement, wiring runs, and electrical connections.
- Apply for all necessary rebates and tax credits when purchasing equipment.
- Understand the terms of your equipment warranties. Panels and inverters often have 10-25 year manufacturer warranties.
Thorough planning ensures your installation meets all requirements and proceeds smoothly. Rushing into solar without researching can lead to costly mistakes.
Step-by-Step Installation Guide
Once you've completed all the prep work, it's time to install the system. Follow these steps:
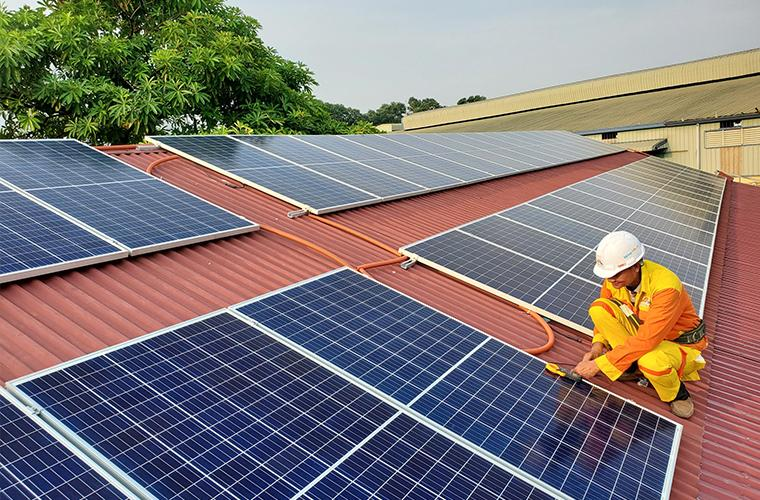
Step 1: Preparing the Site
Clearing and preparing the site is a necessity before installation can begin. The rooftop or ground surface of the location that shall be installed solar equipment must be rid of any debris or obstructions. Besides, positions for this solar stuff should be also measured and marked.
Step 2: Mounting the Solar Panels
The subsequent step is firmly fixing the solar panels and racking system. Installation instructions provided by manufacturers indicate that before any panel racking is done it should be assembled into position on the roof or ground. To avoid shading or any other form of obstruction, proper placement is required. Once racks are in place, installers have to carefully place solar panels on them while utilizing suitable clamps or mountings.
Step 3: Wiring the System
The solar system needs to be wired after mounting equipment’s. Electrical conduit should run from various parts like inverters, disconnects, electrical panels to the solar panels among others. Then correct wiring gets pulled through conduits and connected properly. Safety devices such as overcurrent protection and disconnects should also be included.
Step 4: Connecting to the Grid
For grid-tied solar systems, prior to connection of these systems with the electricity grid must utility approval inspection of wiring and connections has to take place; besides you may need some interconnection agreements that are mandatory for metering purposes too. It is only after getting permission from utility providers that you can complete the final connections between your home wiring and this solar panel system.
Step 5: Testing and Activation
Before activating the photovoltaic installation all wire connections ought to be double checked while voltage levels need monitoring as well . This will help us identify any possible issues in advance. The system can then get switched on allowing us to see whether it sends electricity back into the grid by looking at its meter. Similarly, monitoring energy production over time ensures top performance.
Step 6: Maintenance and Troubleshooting
Some maintenance is also necessary after the installation. The system should be inspected periodically to prevent damage caused by dirt. Additionally, solar panels may need to be cleaned from time to time so as to remain efficient. As soon as there are any issues like wiring faults or inverter problems, you must quickly deal with them. With this, solar systems can continue operating perfectly well.
Following each step methodically is crucial for proper functioning and safety. Don't hesitate to call a solar professional if you get stuck or are unsure during any part of the installation.
Conclusion
Installing solar panels is a detailed yet satisfying endeavor that can give decades of free power. With adequate solar potential and thoughtful planning, homeowners can effectively handle permit acquisition, purchase of equipment, and installation process.
Following the step-by-step guide provided above will help you safely and smoothly transition your home to solar power. Do your research, take it slow, get expert help when needed and soon you'll be generating your own renewable energy from the sun!
FAQ
How much do solar panels cost to install?
On average, installing solar panels costs $2 to $4 per watt. Most systems for homes come up to $10,000-$25,000 after receiving tax credits. The size of the system, quality of the panels and equipment being used, location and difficulty of installation on the roof all affect the final price.
Should I buy or lease solar panels?
Having complete ownership over your solar panel system allows you to save more money in the long run but requires a larger initial investment. Solar leases do not need any money upfront but involve monthly payments and less system ownership. Weigh these options based on what best suits your situation.
How long do solar panels last?
At minimum, modern solar panels are capable of generating electricity consistently for 25-30 years or longer. As long as you take care of them properly through regular maintenance checks etc., they should keep working well into their old age. However, it's worth noting that an inverter might have to be replaced within 10-15 years depending on usage.


