How to Hook Up Solar Panels to RV Batteries
When we present our “Solar 101” seminars at RV & Sports Shows around the country, the number one question we get from new RV and van owners is, “My rig says it’s ‘solar ready’...what does that mean, and what do I need to do to wire solar panels to my RV?”
But before you go cutting wire and grabbing MC-4 connectors, it’s important to first assess your energy needs and THEN size a solar powered system that’s going to fit your rig and how you intend to use it.
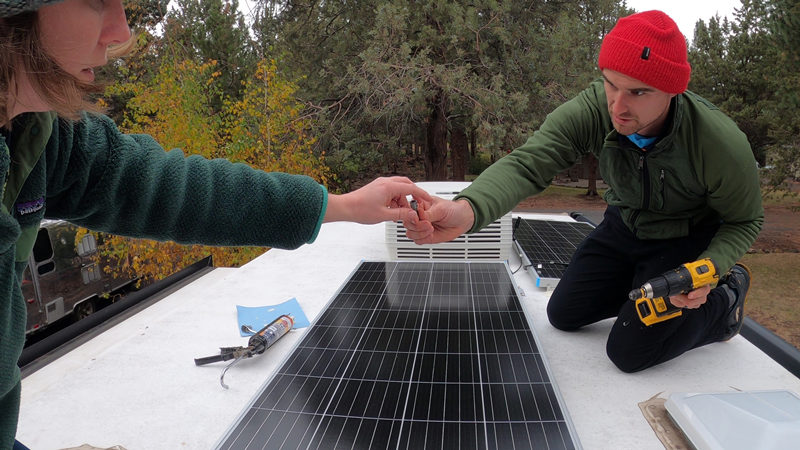
How to Wire Solar Panels to RV?
Here are some questions to ask yourself before simply hooking up solar panels to your RV.
● How many days do I want to run my RV without plugging into an external electrical outlet (e.g., “shore power” at an electrical campsite)?
If you only plan to spend one or two nights in between electrical hook-up campsites then your solar paneled system can be simple. One option is a solar suitcase (with an included charge controller) that can simply be connected to your RV battery via alligator clips - red to positive & black to negative. On the other hand, if you plan to go fully off-grid and run your RV with solar, like we do, then you will need to plan out a much more robust system, with all 4 components of a solar paneled system. See this helpful worksheet to begin this process.
● Is my RV/van listed as “solar ready” or “pre-wired for solar”?
Is there a solar input port on the outside of the rig? Does it require a specific brand of solar panel (or provide a QR code or website for more information)? This will help you determine what type of panels you’ll need to purchase – or if you simply need to buy an inexpensive SAE to MC-4 adapter and SAE reverse polarity plug (search this product on Amazon) to adapt them for Renogy solar panels. You can then choose rooftop panels or a solar suitcase, or better yet, a combination of both that will give you more boondocking flexibility. Check out this blog to learn more about what “solar ready” means.
● Is there a solar panel already installed on top of my rig (usually less than 50W)?
We get this question a lot, “I already have a small panel on my roof, can I just tie that into my new system?” The answer is, probably not. These smaller factory installed panels are designed to simply maintain an already charged battery, so that the RV’s lights and slideouts work while for customer walk-throughs while sitting in the dealer lot.
This small panel is NOT designed to recharge a depleted battery while boondocking. If you plan to install more permanent solar panels, this small one will likely have to come out – in addition to the small charge controller connected to it and any wiring currently going to the battery. To have an effective solar panel system, with multiple panels, they all need to be all the same wattage.
● What is the capacity and type of my RV battery bank?
Unless you plan to replace these batteries, you need to know this so you can determine how to charge the RV battery with solar panels. Most rigs these days are equipped with AGM or flooded lead acid batteries, which range from 85-200Ah. Some newer, higher-priced rigs which are designed for boondocking provide Lithium Iron Phosphate (LFP) batteries pre-installed. These LFP batteries are longer lasting, more expensive, and more powerful.
Knowing the size and type of your battery bank will help you determine how many panels you’ll need, as well as the size of the charge controller. See this blog for more detailed information about deep cycle battery options.
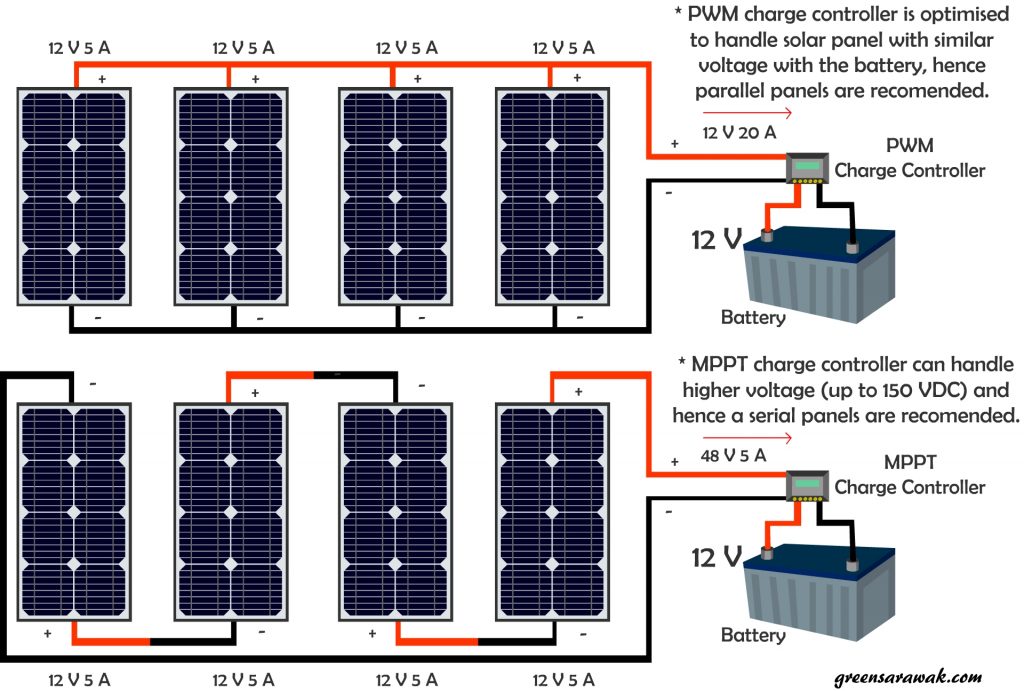
● What is the square footage of my RV roof? How many panels will fit? And, how do you plan to connect them (parallel vs. series)?
While Renogy panels range from 50W to 550W, most RVers use 100W - 200W panels due to roof size / dimension limitations. Here are some options:
Rigid Panels Options: 100W panels weigh 14.5 lbs each and measure 43.3”x 20” x 1.38”; 200W panels weigh 26.46 lbs each and measure 58.7” x 27.5” x 1.38”
Flexible Panel Options (very lightweight, durable, and designed for curved roof lines): 100W weigh 4.2 pounds each and measure 48” x 21.6” x 0.08”; 175W weigh 6.2 lbs each and measure 59.2” x 26.5” x 0.08”; 200W weigh 10.8 lbs each and measure 63.2” x 29.4” x 0.1”
See this blog (scroll down a bit) for more information about how and why to create a solar array in parallel or series (or both).
● Does my RV/van manual mention anything about a solar charge controller already installed?
While it's always good to check to be sure, more than likely the RV will NOT be equipped with a charge controller as they come in different sizes (rated in amps) to accommodate the total power output of your solar array, as well as the type of batteries to which it will be connected.
To help you get your head around an installation, check out this 1 minute solar panel installation overview:
How to Wire Solar Panels to RV?
Now that you’ve answered some key questions and you’ve planned out your system, let’s dive into some wiring and connection steps so you can know how to charge your rv battery with solar panels!
First, if you have a “solar ready” port on your RV, your energy needs are low, you usually camp in very sunny locations, AND you only plan to boondock for a night or two, then a single 100W or 200W solar suitcase with an attached charge controller may be all that you need. As mentioned before, “solar ready” plugs may have intentionally reversed the polarity of the plug to only work with a specific brand name solar panel. To determine this, check the polarity of the plug with a voltmeter or multimeter. You may need to purchase an SAE reverse polarity plug in order to use Renogy panels.
BUT, if you want to create a system that will allow you to live off-grid for longer and/or to meet higher energy demands, then read on for basic diagrams and step-by-step instructions.
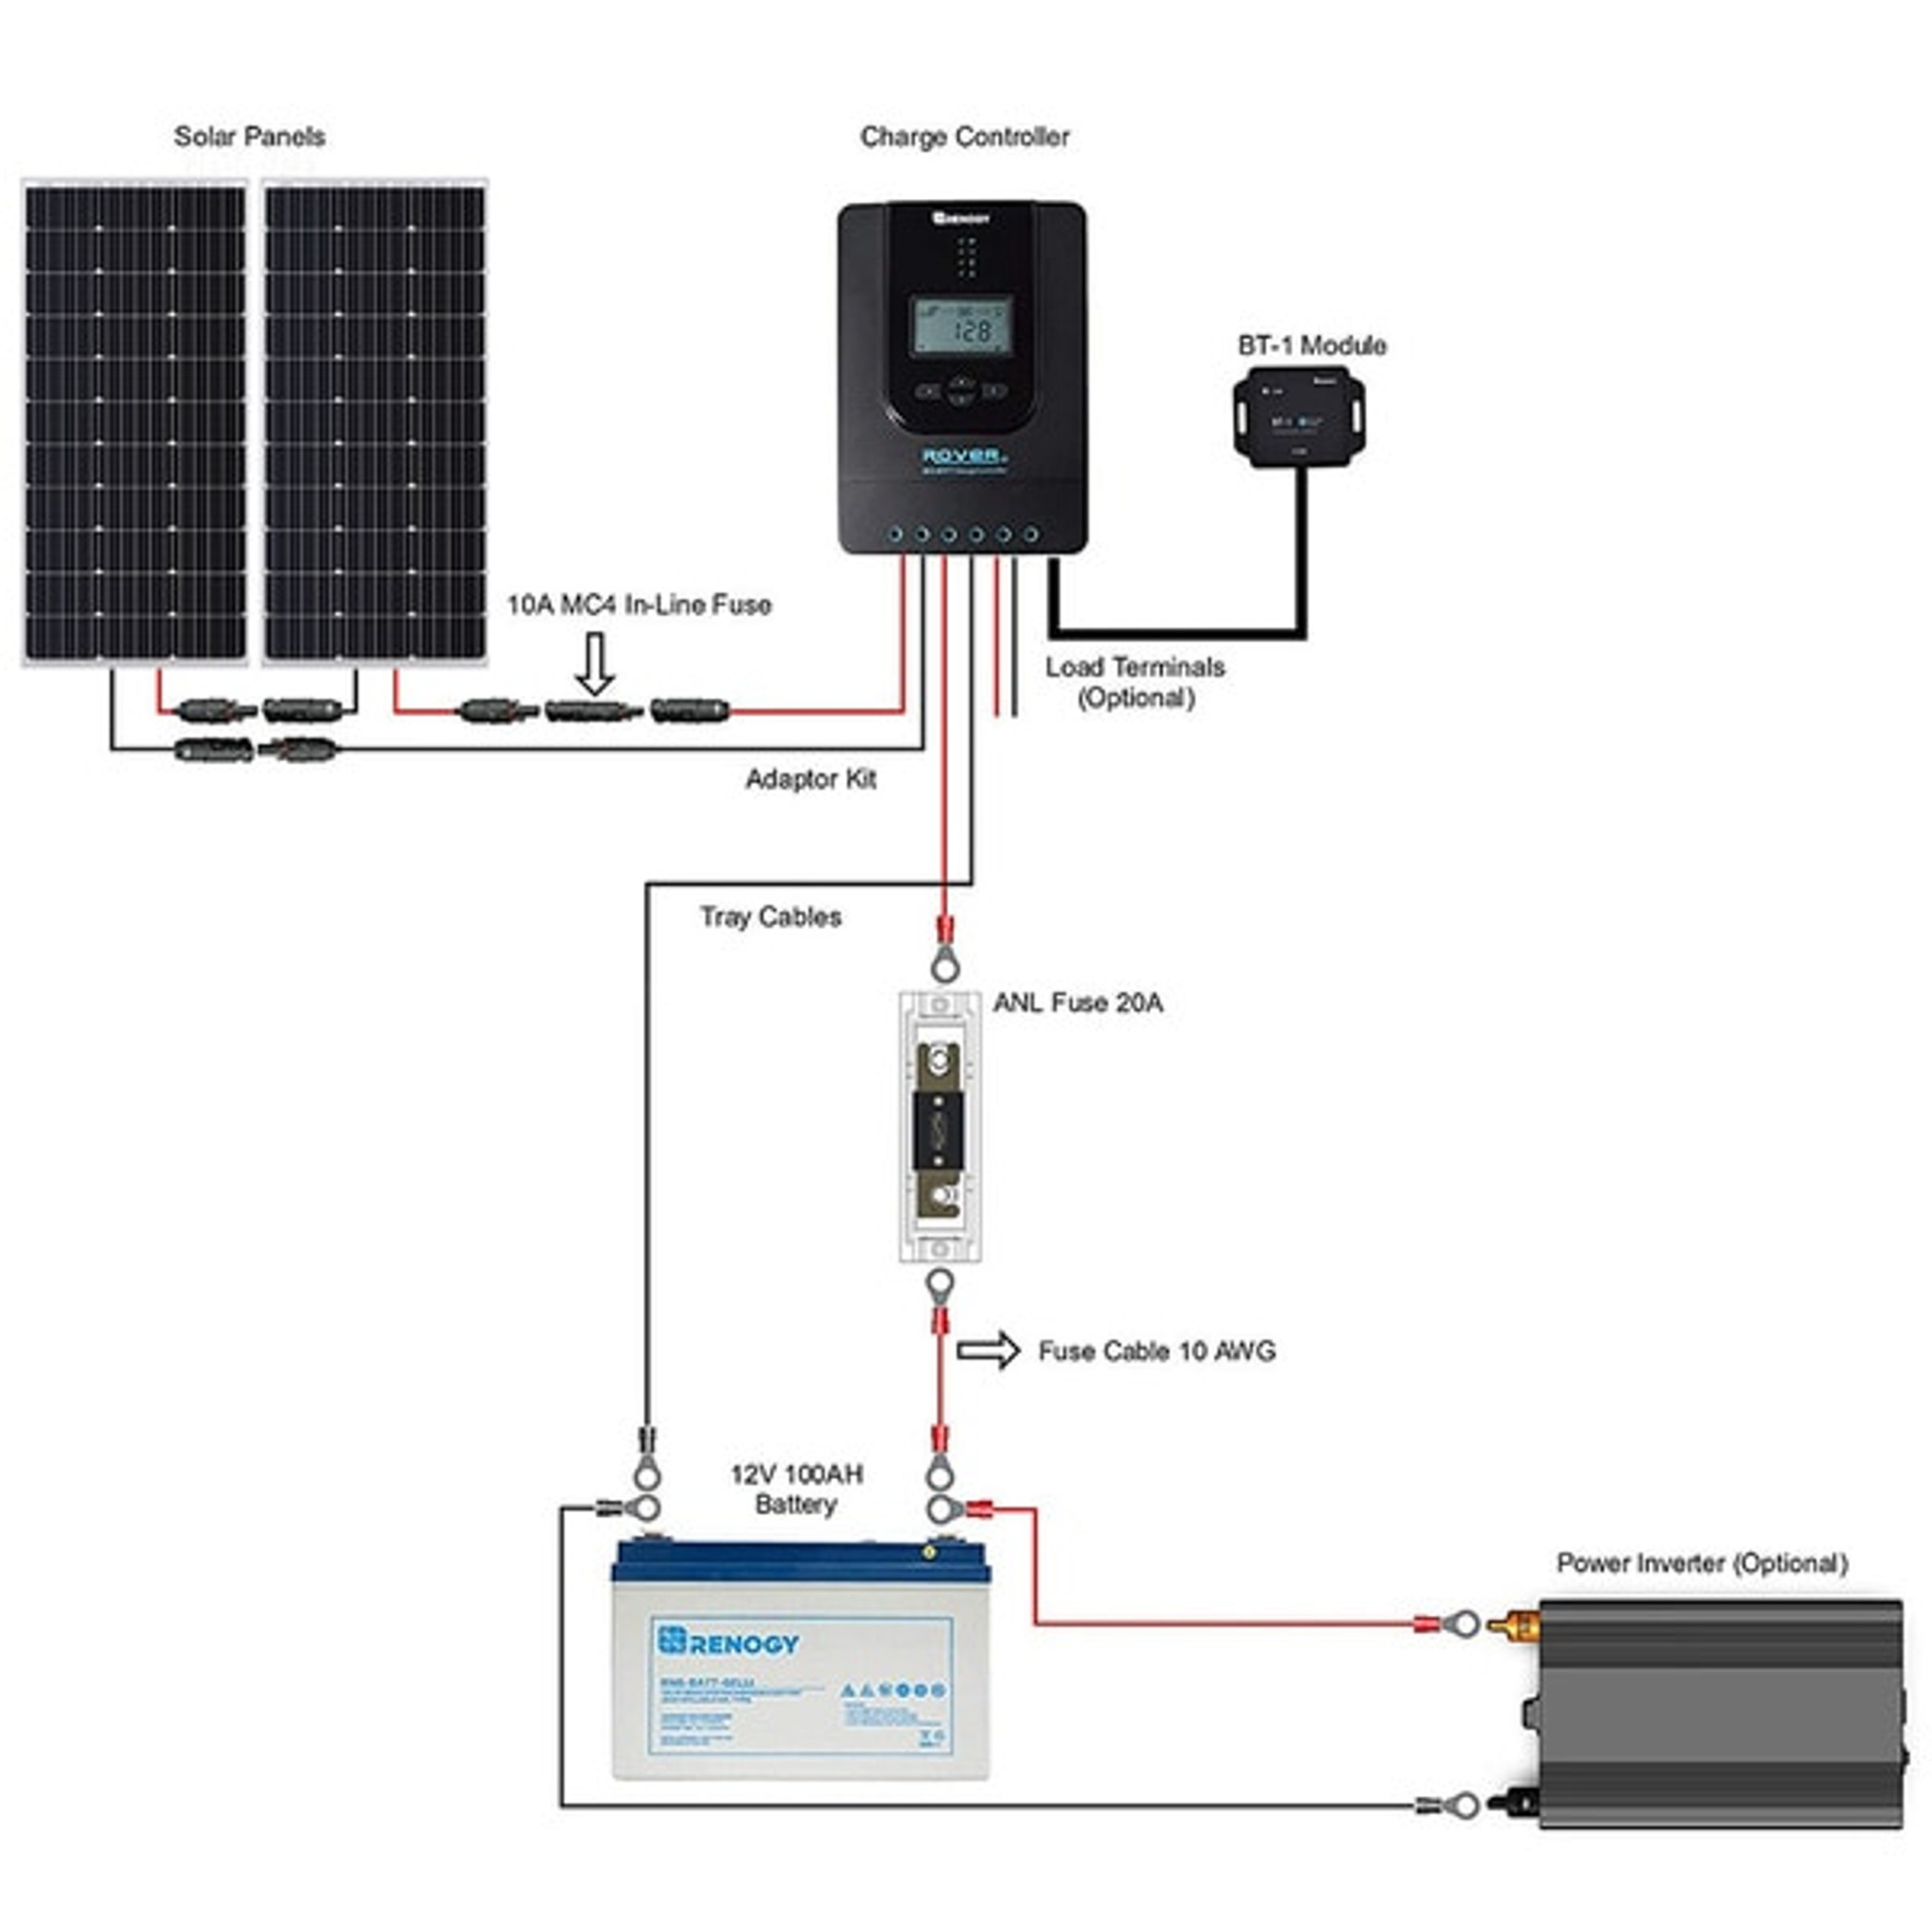
Step by Step Instructions for an RV Solar Connection:
1. Secure the solar panels to the roof of your RV. There are many ways to do this depending upon the type of panel you will use and the material of your RV roof. See this blog to learn various ways to attach different types of solar panels to your rig.
2. Wire the panels together (in series, parallel, or both) using MC-4 Branch Connectors. Be sure to mark the positive (+) wire with red electrical tape, so you know which wire is which. Add an appropriately-sized inline fuse (easy to connect MC-4) downstream of the branch connections along the positive (+) wire as this protects the wire from damage. Next, mark the end of that same positive (+) wire with red tape. Send both wires through the cable entry gland on the roof (this housing makes drilling and sealing a hole into the roof of your RV painless!). Now, when you get down into the RV for the next few steps, you'll be certain which wire is positive and which is negative.
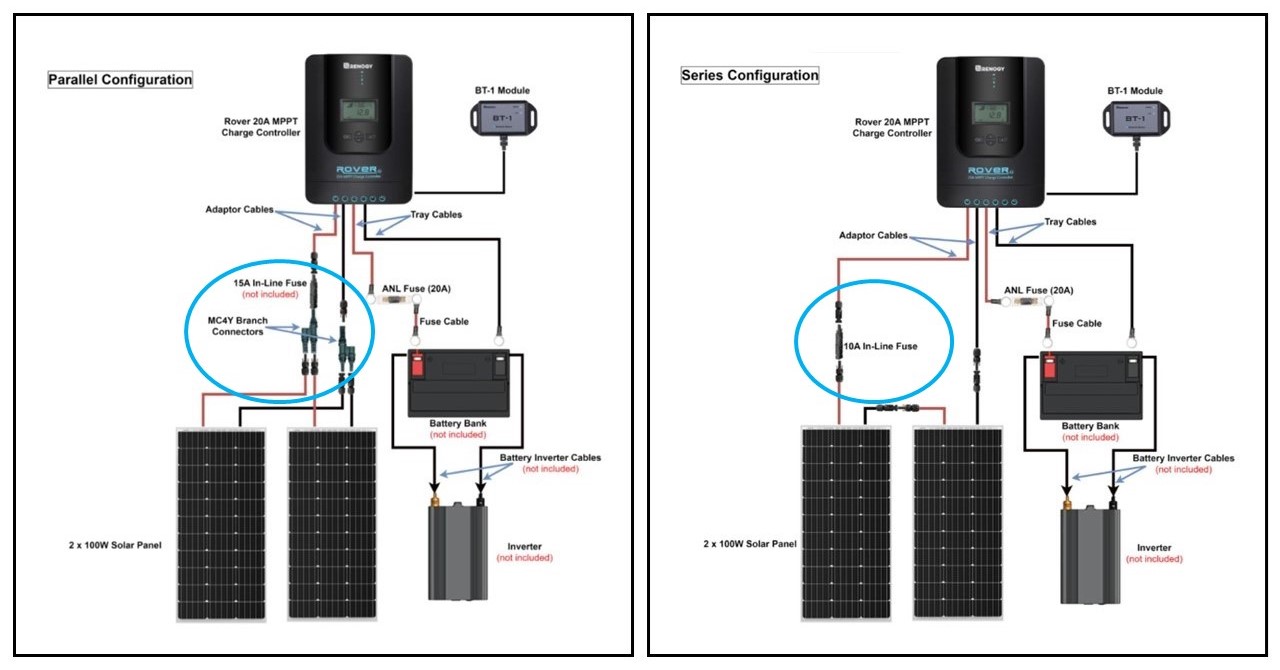
3.While this is somewhat counterintuitive, you MUST connect the solar charge controller to the battery bank, BEFORE wiring the solar panels to the charge controller because when the panels are irradiated by the sun, they immediately begin producing power, and that power has to have somewhere to go. Safety Tip: Cover your panels so they are not irradiated before beginning any wiring so that there is no power/energy running through the system.
4. Locate the output side of the charge controller. Using appropriately-sized tray cables, secure the positive (+) wire into the output side of the charge controller, then connect it to an appropriately-sized ANL fuse (or breaker switch), then from the fuse to the positive (red) terminal on the battery or positive battery bus bar. Secure the negative (-) wire into the output side of the charge controller and run it directly to the negative (black) terminal on the battery, or negative bus bar. Note: Bus bars are appropriate when you have more wire terminals to connect to the battery terminals than can easily fit. It’s a great way to easily manage wiring. See diagram below.
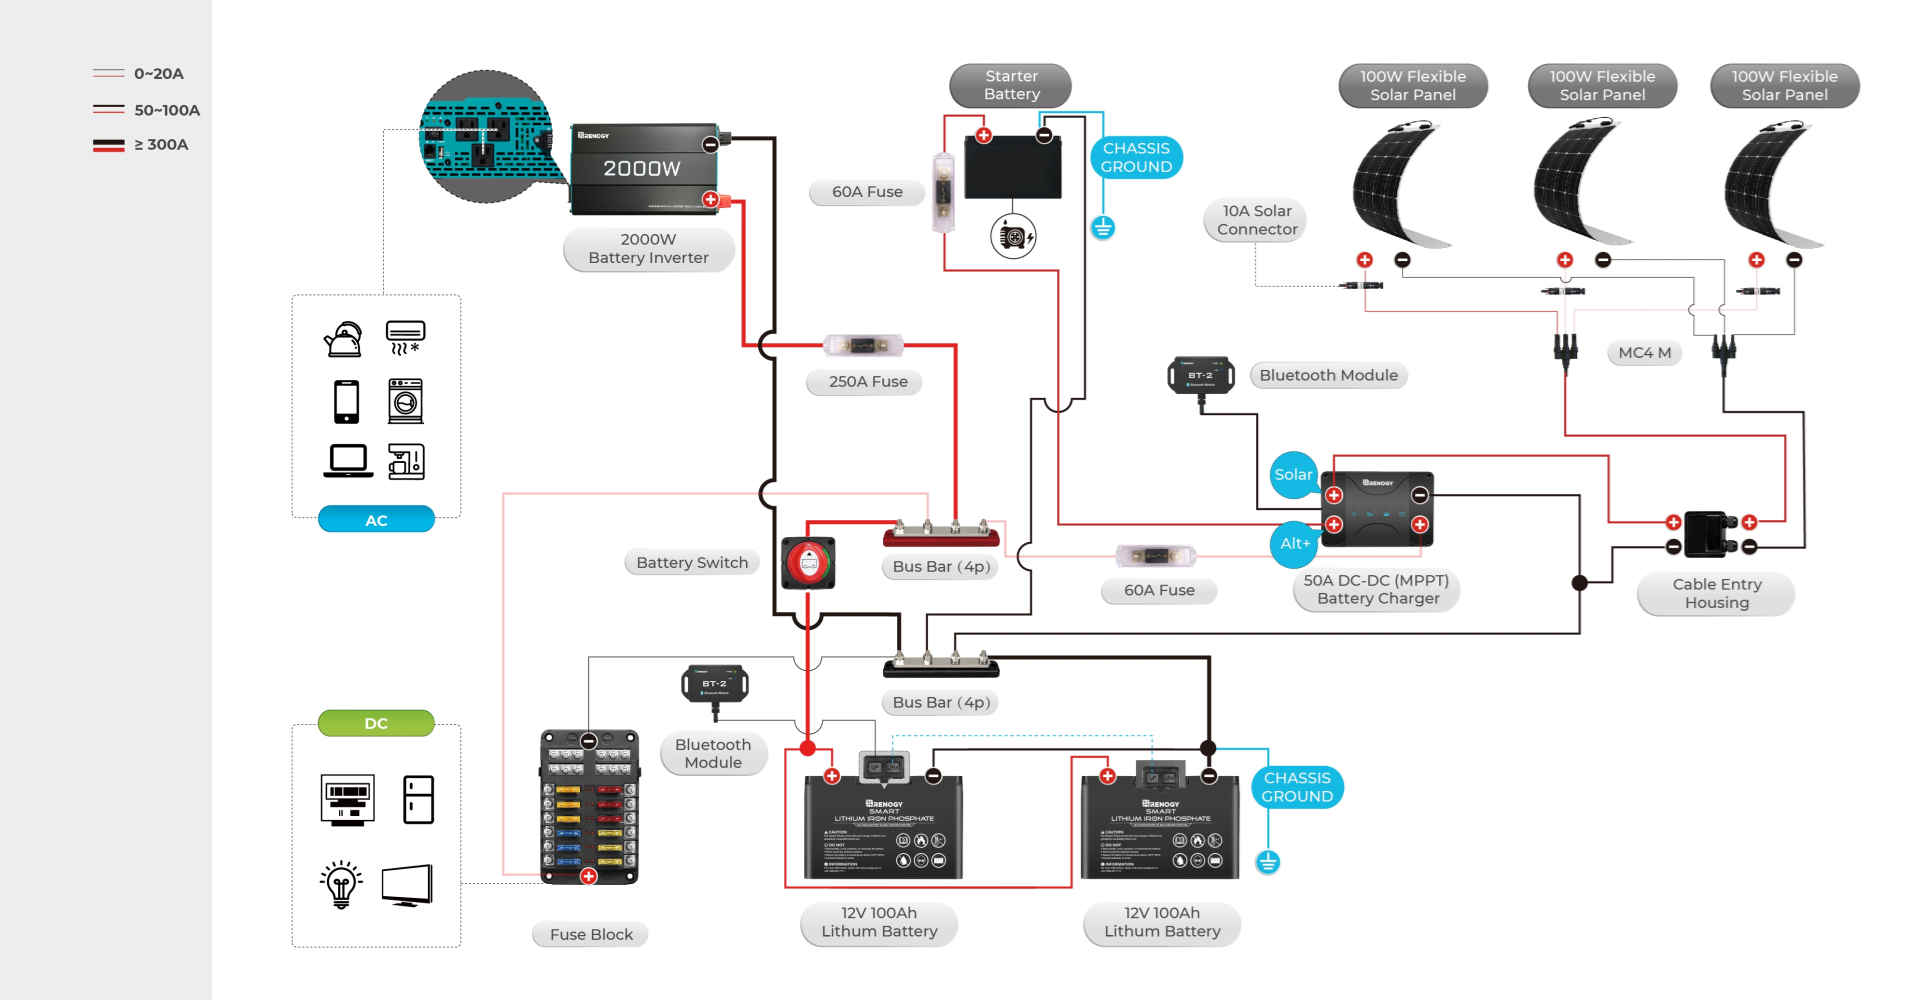
Unless you have an on/off switch on your battery (and the battery is set to off), the charge controller should power on immediately as you’ve just given it the power it needs for the display to operate. Important! Read the Quick Start Guide and set the battery type (Flooded, AGM, Gel, Lithium) or use the manual setting if applicable. Also, be sure you’ve provided adequate space for the charge controller to vent. This necessary ventilation space is clearly outlined in the Quick Start Guide. Finally, if the charge controller does not power on, see the troubleshooting chart for possible issues before proceeding to the next step.
5. Locate the input side of the charge controller. With the 2 wires coming in through the cable entry housing from the roof, find the positive wire (that you marked with red tape). Secure it into the (+) terminal of the input side of the charge controller. Next, take the negative (-) wire and secure it into the (-) terminal on the input side of the charge controller.
Those are the basics! To watch a complete installation (from panels to charge controller to battery), check out this video:
While there are many different solar panel configurations, types and sizes, the way to hook up solar panels to your RV is usually the same – Panels to Charge Controller to Battery Bank to a DC Fuse Box and/or a DC to AC Inverter. Check out our Solar Resources page and you’ll be running your RV off of solar power in no time!
In 2012, Shari Galiardi & David Hutchison left behind careers and a comfortable home in North Carolina to travel with the vintage camper trailer they lovingly restored, outfitted with solar, and named "Hamlet." What began as a short break from careers and responsibility quickly turned into a love affair with roadlife. They have parlayed their higher education backgrounds, desire for life-long learning, and thirst for adventure travel into writing, photography, video production, and public speaking gigs from coast to coast. Known to their friends as simply Shari & Hutch, you can learn more about their full-time, solar-powered adventures on their website at freedominacan.com. Or, follow them on Facebook, Instagram, and YouTube as “Freedom in a Can, LLC.”

Related articles:
How Does The Solar Tax Credit Work?
Everything You Ever Wanted To Know About Renogy Charge Controllers
RV Inverter Installation Guide
Battery Dies In Cold Weather: What Low Temperatures Do To Your Battery
Solar Battery Storage System Cost: Things You Need To Know
im


