")
How to Build a Solar Panel (2024 Guide)
Are you interested in harnessing solar energy but concerned about the cost? Learning how to build a solar panel at home can be a rewarding and cost-effective solution. This guide will walk you through the process of making your own solar panel, from gathering materials to final assembly.
How to Build or Make a Solar Panel: Step-by-Step Guide
-
Gather the Materials Needed for Your Photovoltaic Solar Panel
- Solar Cells
- Wiring and Connectors——Tabbing wire, Bus Wire and MC4 connectors
- Electrical Components——Blocking diodes(usually 10A Schottky diodes) and Flux pen for soldering preparation
- Soldering Equipment——Soldering iron(30-40 watts) and Rosin-core solder (60/40 tin-lead or lead-free)
- Plywood (3/4 inch thick) for backing board
- Aluminum angle for framing (1 inch wide)
- Wood screws and aluminum screws
- Glass Cover
- EVA (Ethylene Vinyl Acetate) film
- Tedlar backsheet
- Weather-resistant box with cable glands
- Sealants and Adhesives——Silicone caulk and UV-resistant epoxy
- Multimeter for testing
- Protective gloves and eyewear
- Ruler or measuring tape
- Pencil for marking
- Charge controller
- Batteries for energy storage
- Power inverter to convert DC to AC power
-
Planning Your Solar Panel
-
Preparing the Frame
-
Wiring the Solar Cells
-
Connecting Cell Strings
-
Mounting Cells in the Frame
-
Adding the Glass Cover
-
Installing the Junction Box
-
Testing Your Homemade Solar Panel
The first thing you need to do when building your own solar panels is to gather all the materials you need for the photovoltaic solar panel.
Materials for Solar Cells and Electrical Components
Materials for Frame and Structure
Tools and Safety Equipment
Optional Components
When starting to build your own solar panel, the first step is to determine the size and wattage of the panels you need, along with the number of solar cells required. It's important to calculate your home's daily power needs. If that feels overwhelming, you can use our calculator or check out this article for guidance. This step is essential to ensure the efficiency and output of your panels.
With your plan in hand, you're ready to prepare the frame. Cut a piece of plywood for the backboard, making it slightly larger than the total area your solar cells will cover. Next, construct a sturdy, square frame around this backboard using aluminum angles. This frame will protect your cells and give your panel its strength.
Now comes the most intricate part: wiring the solar cells. Arrange your cells in series, carefully soldering tabbing wire to connect the front of one cell to the back of the next. This requires a steady hand and patience. Test each connection with a multimeter as you go – it's much easier to fix any issues now than later.
Once you've created your strings of cells, connect them using bus wire. This is where you'll see your panel taking shape. Don't forget to add bypass diodes at this stage. They're essential for maintaining efficiency if part of your panel gets shaded.
The next critical step is mounting the cells in the frame. Securely attach your cell strings to the backboard, ensuring they're evenly spaced and perfectly aligned. Then, carefully weatherproof all the connections. This step is vital – any moisture that gets in can ruin your panel.
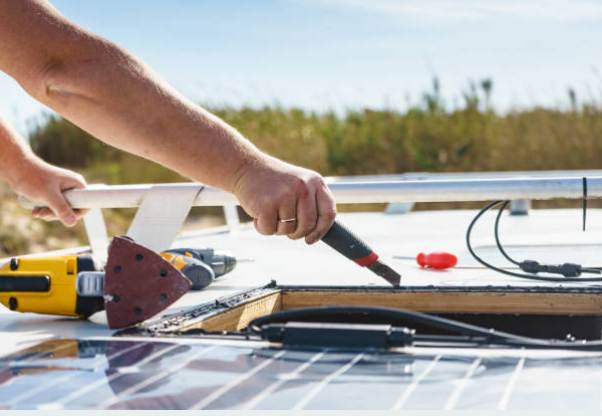
Adding the glass cover requires extra care. Clean your tempered glass thoroughly before gently lowering it onto the frame. Use high-quality silicone caulk to create a weathertight seal between the glass and the frame. This not only keeps out moisture but also protects your delicate cells from the elements.
Your final assembly step is installing the junction box. Attach it to the back of your panel, making sure all the main wires are properly connected. Seal the junction box correctly – it's your panel's main defense against water ingress.
With your panel assembled, it's time for testing. Take your solar panel outside on a sunny day and use your multimeter to measure the voltage output. Watch the readings climb and check for proper functioning, ensuring all connections are solid and your panel is producing the expected output.
Materials Needed to Build a Solar Panel: Detailed Instruction
When you build a solar panel at home, gathering the right materials is crucial for success. The following is the materials you need and their detailed introduction.
- Solar Cells
- Frame Materials
- Glass Cover
- Encapsulation Materials
- Electrical Components
- Soldering Equipment
- Other Tools
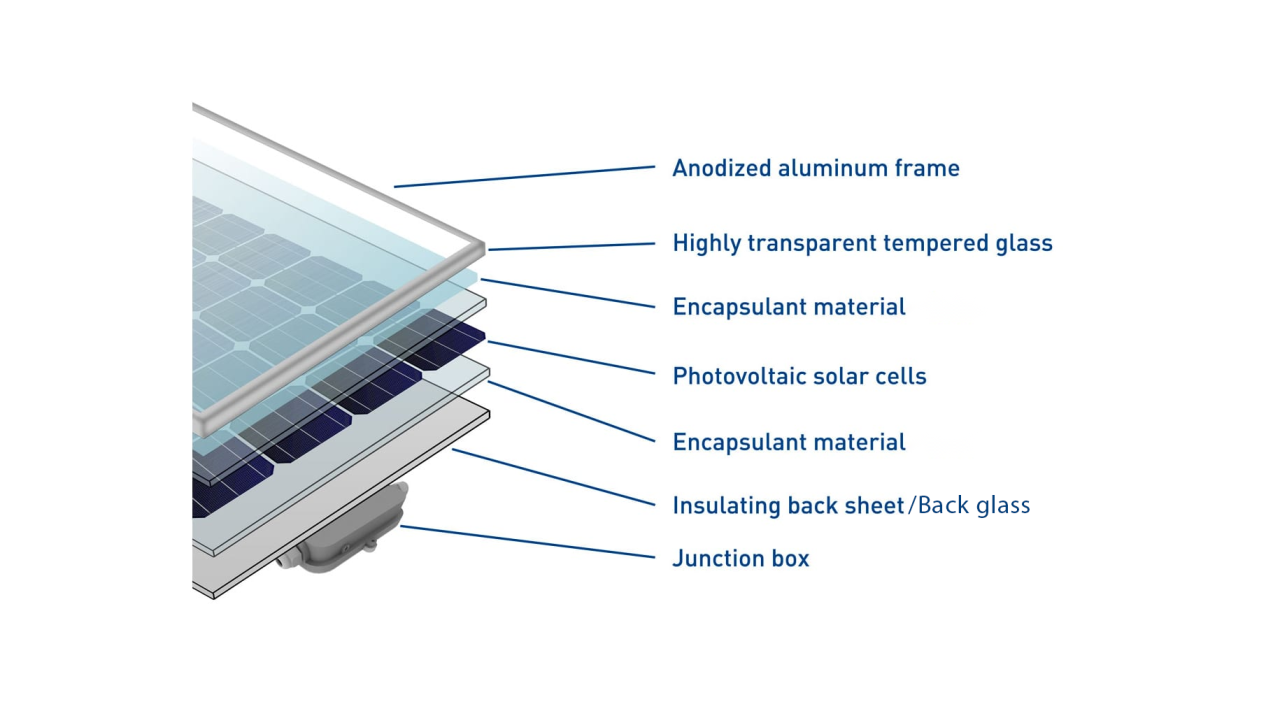
At the heart of your DIY solar panel are the solar cells themselves. These photovoltaic marvels, typically made of monocrystalline or polycrystalline silicon, come in sizes ranging from 3x6 inches to 6x6 inches. The number you'll need depends on your desired panel size and output, so careful planning is essential. We typically suggest 36 of these for a standard panel.
To house these cells, you'll need to construct a sturdy frame. A piece of 3/4-inch thick plywood serves as an excellent backing board, while aluminum angle pieces create a durable border. Don't forget the wood and aluminum screws to hold it all together.
Protecting your cells is a sheet of tempered glass, slightly larger than your frame. Opt for low-iron, high-transparency glass to maximize sunlight absorption.
Encapsulation is key to protecting your solar cells from the elements. Using EVA film and a Tedlar backsheet. These materials protect the cells and keep moisture out – crucial for longevity.
The electrical components form the nervous system of your solar panel. You'll need tabbing wire, typically 1.8mm wide and tin-coated copper, to connect individual cells. Bus wire, a heftier 5mm wide version, links your cell strings together. A flux pen helps prepare surfaces for soldering, which you'll do with a 30-40 watt soldering iron and rosin-core solder. Don't forget the blocking diodes, usually 10A Schottky diodes, which prevent reverse current flow.
To channel your newly generated electricity, you'll need a junction box. This weather-resistant container houses your connections and should include cable glands and MC4 connectors for easy and secure wiring. Silicone caulk and UV-resistant epoxy will be your allies in weatherproofing, sealing out moisture and ensuring your panel can withstand the elements.
A multimeter is indispensable for testing your connections and output. Protective gloves and eyewear are non-negotiable for safety. A simple ruler or measuring tape and a pencil will help you lay out your design precisely.
For those looking to create a standalone system, additional components like a charge controller, batteries for energy storage, and a power inverter to convert DC to AC power may be necessary. These elements transform your single panel into a more comprehensive solar power system.
When gathering these materials, it's important to source high-quality components, especially the solar cells, as they directly impact the efficiency and longevity of your homemade solar panel. Many of these items can be found at hardware stores, electronics suppliers, or specialized solar equipment retailers. Some components, like solar cells, may need to be ordered online from specific suppliers.
Additionally, when you gather your materials, consider purchasing extras, particularly cells and wiring. The construction process can be delicate, and having spares on hand can save you time and frustration if any mishaps occur.
Conclusion
Building a solar panel at home is an achievable project that can introduce you to renewable energy. While it requires time and careful work, the satisfaction of creating your own power source is unmatched. Remember, for larger energy needs, professionally installed systems are recommended.
FAQ
How long does it take to build a solar panel at home?
The time to build a solar panel at home typically ranges from 1 to 3 full days for a beginner. This includes planning, frame construction, cell wiring, assembly, and testing. The exact duration depends on your experience level, panel size, and available time.
Can homemade solar panels power my entire house?
Homemade solar panels can potentially power your entire house, but it depends on several factors, such as the size and efficiency of the panels, the amount of sunlight your location receives, and your household's energy consumption. To accurately determine if homemade solar panels can meet your energy needs, calculate your daily power usage and compare it with the potential output of your solar panels.
Is it legal to install DIY solar panels?
The legality of installing DIY solar panels varies depending on your location. In many places, you are allowed to install solar panels on your property, but there may be specific regulations and permitting requirements you need to follow. It's important to check with local building authorities and utility companies to ensure compliance with zoning laws, electrical codes, and safety standards.


