

How Long Does It Take To Install Solar Panels: A Complete Guide
How long does it truly take to harness the power of the sun for your home? While the promise of clean, renewable energy is alluring, many homeowners are uncertain about the timeline for solar panel installation. Contrary to popular belief, the process extends beyond the physical mounting of panels on your roof. From initial consultation to final activation, the journey to solar energy typically spans 2-3 months. This comprehensive timeline encompasses several crucial phases: site assessment, system design, permitting, installation, and final inspections. Understanding this process is essential for homeowners considering the switch to solar, as it allows for proper planning and sets realistic expectations for when you'll be able to start generating your own clean electricity.
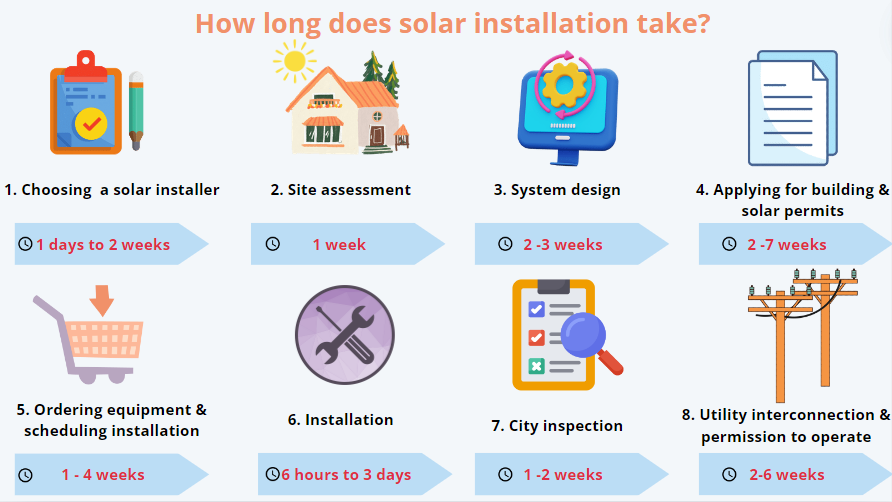
How long does solar installation take?
The transition to solar energy is a substantial and exciting investment. Knowing the installation timeframe allows you to plan and guarantee that the procedure runs properly. Here's an in-depth guide to each phase of the solar installation process, complete with specific information and interesting insights to make it both instructive and engaging.
Step 1: Site Assessment (1-3 Days)
The route to solar energy begins with a site survey, which usually takes one to three days. During the initial step, a skilled solar specialist will assess your property's compatibility for solar panels. They will consider roof quality, orientation, tilt, and any shading difficulties from neighboring trees or buildings. This stage is critical because it establishes the groundwork for developing an effective solar power system based on your individual requirements.
A full site inspection entails collecting precise measurements and, in certain cases, employing drone technology to obtain a detailed image of your roof. The expert will also examine your previous electricity bills to determine your energy use trends. This information aids in the design of a system that fits your energy needs while increasing efficiency and cost savings. The site inspection not only assures the installation's technical viability, but it also helps detect any possible issues early on, resulting in a smoother procedure later on.
Step 2: Custom Solar System Design & Engineering (1-2 Weeks)
After the site inspection, the next stage is to custom design and engineer your solar system, which might take one to two weeks. During this step, solar engineers will create a detailed plan that includes the kind and number of solar panels, inverter placement, and wiring architecture. This bespoke design ensures that your system functions smoothly and meets local building codes and legislation.
During this step, the design team use cutting-edge software to simulate the performance of your solar system, taking into account aspects like as sun exposure, shading, and roof orientation. This ensures that the design is optimized for optimum energy output. The experts will also consider aesthetics to ensure that the system blends in with the design of your home. The bespoke design process not only ensures peak performance, but it also increases the overall beauty and value of your house.
Step 3: Solar Permit Application Process (2-4 Weeks)
Securing the required permissions is a critical stage in the solar installation process, which normally takes two to four weeks. Your solar supplier will manage the paperwork, submitting applications to local authorities for the necessary permissions. This phase guarantees that your solar system complies with all safety and building codes set by your city or county.
The permission application procedure can be complicated and time-consuming, requiring several paperwork and precise blueprints. Your solar supplier will submit electrical and structural plans, equipment specifications, and other required documentation to the appropriate authorities. They will also work with your homeowner's association (HOA), if relevant, to guarantee compliance with any community requirements. While this process may appear onerous, it is critical for guaranteeing the safety and legality of your solar system.
Step 4: Solar Panel Installation (1-3 Days)
After obtaining the permissions, one of the easiest procedures is to install the solar panels, which typically takes one to three days. A team of expert installers will come to your home to install the panels on your roof, attach the inverter, and wire the system to your electrical panel. Despite its brief length, this phase necessitates accuracy and skill to assure peak performance and safety.
The installation procedure consists of many critical phases, including mounting the solar panels, connecting the inverter, and integrating the system with your home's electrical setup. The technicians will first fasten the mounting system to your roof, making sure it is correctly secured and sealed to avoid leaks. They will next install the solar panels and link them to the inverter, which transforms the panels' direct current (DC) to alternating current (AC) for usage in your house. Finally, the system is connected to your electrical panel, allowing you to use solar energy easily.
Step 5: Final Inspection and City Approval (1-2 Weeks)
Following installation, a final inspection and city permission are necessary, which might take another one to two weeks. A local inspector will check your property to ensure that the installation meets all standards and requirements. This step is critical to assuring the safety and dependability of your solar power system.
The inspection procedure entails a complete examination of the installation, including testing the mounting system, electrical connections, and overall system configuration. The inspector will confirm that everything is properly installed and that the system meets local building and electrical requirements. Once the system has passed inspection, you will be given the formal clearance to proceed to the last phase. This accreditation confirms the quality and safety of your solar system, providing you peace of mind and confidence in your investment.
Step 6: Permission-to-Operate from the Utility Company (1-3 Weeks)
The final stage in the solar installation procedure is to receive permission to operate (PTO) from your utility provider, which can take one to three weeks. The utility provider will analyze your system's paperwork and provide a final assessment. Once permitted, you may turn on your solar power system and begin generating electricity.
Obtaining PTO requires submitting documents to the utility company, such as the final inspection report, electrical schematics, and system requirements. The utility provider will analyze this information to ensure that your system complies with all technical and safety standards. They may also make a site visit to check the installation. Once the PTO is given, you may activate your system and start reaping the advantages of solar energy.
The overall time required for solar installation can range from six to twelve weeks, depending on factors such as local permitting processes and the intricacy of your system. Understanding each process and its duration will help you prepare for a seamless and effective transition to solar energy.
Factors that impact solar panel installation Times
Several key factors influence how long it takes to install solar panels on your home:
HOA approval
If you live in a community with a Homeowners Association, obtaining their approval can add time to your project. Some HOAs have specific guidelines for solar installations, and the review process can take several weeks or even months, depending on the association's responsiveness and any negotiations required.
Roof Complexity and Condition
A simple, well-maintained roof allows for quick installation. Complex roofs with multiple angles, skylights, or chimneys require more time. If repairs are needed, this can extend the timeline significantly.
System Size and Design
Larger systems naturally take longer to install. Additional components like battery storage or complex monitoring systems also increase installation time. Custom designs for unique properties may require extra planning.
Local Regulations and Permits
Navigating bureaucratic processes can be time-consuming. Permit requirements and inspection schedules vary by location. Some areas have streamlined processes, while others may involve weeks of waiting and multiple approvals.
Weather Conditions
Rain, snow, or high winds can pause installation for safety reasons. Seasonal factors like shorter winter days or summer heat waves can also impact work schedules and crew efficiency.
Grid Connection and Utility Approval
The final step of connecting to the power grid depends on your local utility company's timeline. This process can take anywhere from a week to over a month, depending on the company's workload and your system's complexity.

Go Solar Today and Reap the Benefits Soon
So, how long does it take to install solar panels? While the on-site work might only span a few days, the entire process typically takes 2 to 3 months from start to finish. But don't let this timeline deter you – the wait is well worth the reward!
Renogy's high-quality solar panels are ideal for a smooth solar voyage. Renogy solar panels, known for their efficiency and longevity, may help you increase energy output while minimizing installation difficulties. Their high-quality items are built to withstand the elements and the test of time, so your investment will pay you for decades to come.
Remember, every day you wait is another day of potential savings lost. The sooner you start, the sooner you'll be basking in the glow of lower energy bills and a reduced carbon footprint. So why wait? Take the first step towards energy independence today, and soon you'll be powering your home with the ultimate renewable resource – sunshine!


