Register and enjoy 5% off for new orders!

Battery to Charge Controller Tray Cables for 3/8 in Lugs

SKU: RNG-TRAYCB-8FT-12-US
Write a Review
$23.99
230  reward Renogy Rays
Calculater
Start group buy • $168.99 $235.99
DESCRIPTION
【Connect the Battery and Charge Controller】Renogy offers a range of different lengths, as well as four gauge sizes to choose from. 3/8 inch round center hole.
【TUV LISTED】The cable meets TUV standards for PV solar application.It is UV-resistant and waterproof. Produces optimal power output even in high-temperature conditions.
【RELIABLE QUALITY】Heat-shrink tubing insulates wires, provides abrasion resistance and electrical safety.
【PURE COPPER】Tin-plated copper terminals to minimize corrosion and the pure oxygen-free copper wiring ensures maximum conductivity.
Load More
See the specs
Battery to Charge Controller Tray Cables for 3/8 in Lugs
$23.99
$23.99
Notify Me When Available
Option
Battery to Charge Controller Tray Cables for 3/8 in Lugs
Start group buy • $168.99 $235.99
Want to purchase in bulk? Request Bulk Purchase Prices

Return & refund policy
Need help? Call us now: +1 (909)2877111
Review
Free Shipping
Reliable Warranty
Secure Payment
DESCRIPTION
【Connect the Battery and Charge Controller】Renogy offers a range of different lengths, as well as four gauge sizes to choose from. 3/8 inch round center hole.
【TUV LISTED】The cable meets TUV standards for PV solar application.It is UV-resistant and waterproof. Produces optimal power output even in high-temperature conditions.
【RELIABLE QUALITY】Heat-shrink tubing insulates wires, provides abrasion resistance and electrical safety.
【PURE COPPER】Tin-plated copper terminals to minimize corrosion and the pure oxygen-free copper wiring ensures maximum conductivity.


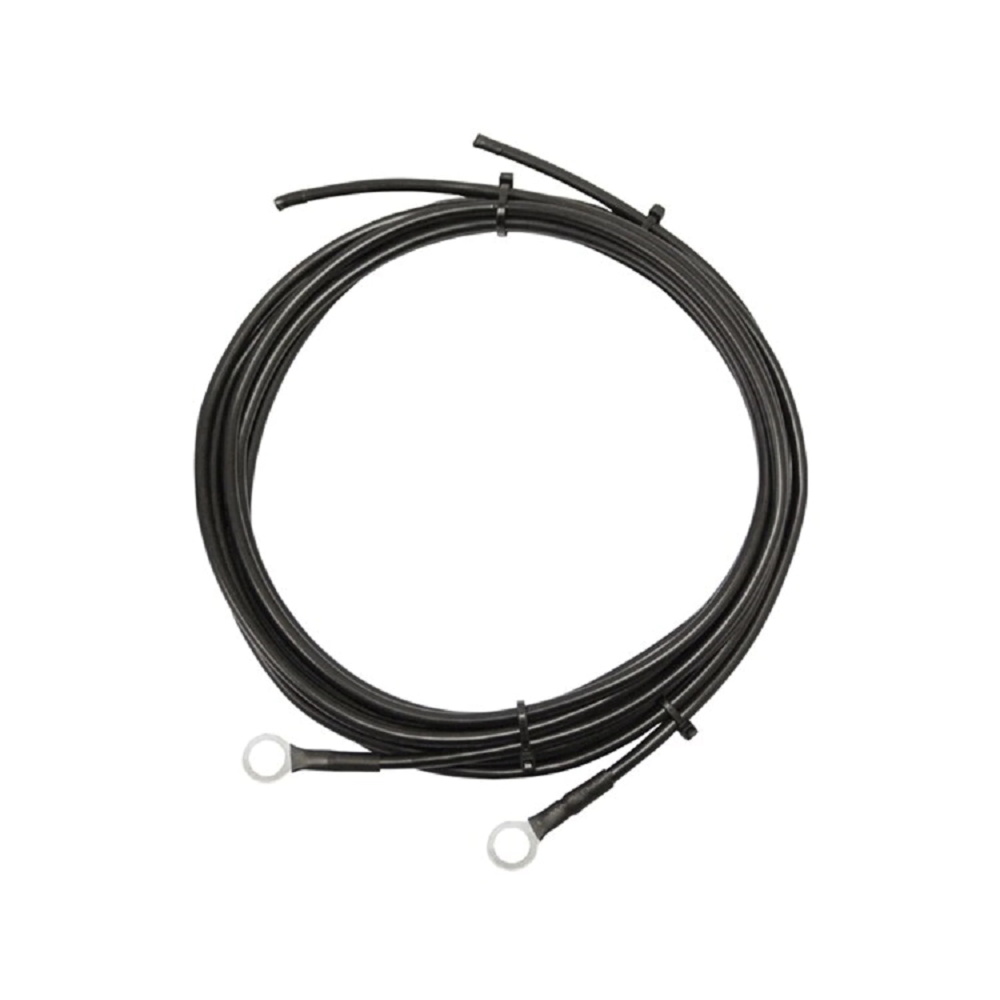
Connect your charge controller to the battery with a pair of Renogy high-quality copper tray cables. Specialized with battery rings on one end for effortless connection to your battery and exposed stranded wire on the other end to lead directly into your charge controller, this wire makes the system set up as easy as can be!

Step 1 Materials & Tools Ready

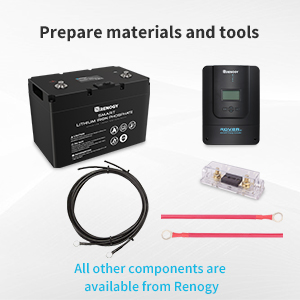
1. Solar charge controller

1 AC Terminal Block

2. Battery

3. Battery cables (with terminal rings on one end and stripped at the other.

4. Fuse set with cable

5. Wire crimper and screwdriver

STEP 2 Connect the Cable with Charge Controller

Insert the stripped end and screw the terminal shut. All Renogy Charge Controller have the battery terminals labeled with a battery icon"BATT".

STEP 3 Connect the Fuse to the Positive Battery Cable

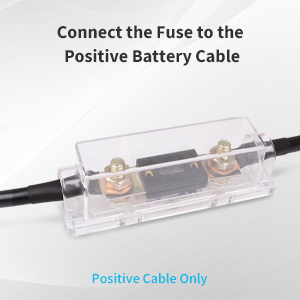
The Renogy ANL fuse will protect the charge controller, wire, and battery from over-current. The fuse set and fuse cable are available from Renogy.

STEP 4 Connect the Battery Cables to the Battery

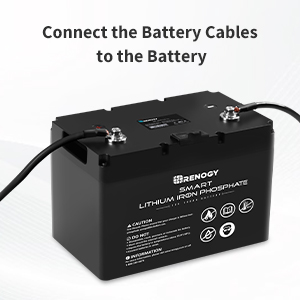
Connect the negative battery cable to the negative battery terminal and the positive cable to the positive terminal.

STEP5 Charge Controller Turn On Now

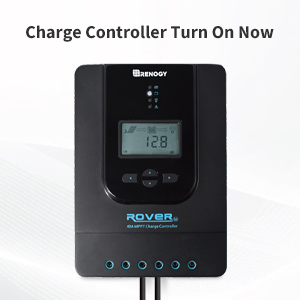
Check the installation instructions in your charge controller’s manual and set up the battery type correctly.

STEP 6 Double Check All Your Connections

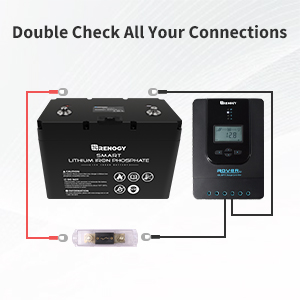
Double check all your connections to make sure that none are loose.

NOTE
  • If you have any questions regarding this product, please call us at 1 (909) 287-7111 or or contact us for troubleshooting assistance.
  • More questions about your off-grid power system? Learn more from Renogy Learning Center!
RV
MARINE
CAMPING
OUTDOOR
CABIN
TRUCK
 

Package Includes

Renogy Solar Tray Cables / one pair

Renogy Solar Tray Cables

1 x pair


DisplayDiscount: 20% OFF

ValentineCat: 4


FAQ

1.What is the tray cable for?
 
The tray cable connects your Renogy solar charge controller to your battery bank ring terminals.
2. Is the length indicated per cable or the total length of both cables together?
 
The tray cable length indicated is for each cable provided.
3. What battery cables do I need to connect my charge controller and battery?
 
Connect your charge controller to the battery with Renogy high-quality coppers tray cable. Specialized with battery rings on one end for effortless connection to your battery and exposed wire on the other end to lead directly into your charge controller, this wire makes the system set up as easy as can be!
4. What wire size should my battery cables be?
 
Consider the following factors when sizing your wire:

1. Current flow in amps. Pick a wire gauge that is big enough to carry the amount of current (in amps) that will be flowing through your system. For instance, if you have one of Renogy 40Amp charge controllers, we would recommend using an 8AWG wires.

2. Charge controller terminals. Some charge controllers have small terminals that won’t accept wire thicker than a certain gauge. Check to see if compatible wire gauges are listed in your charge controller’s manual.

5. Do I need to have the fuse between the charge controller and battery?
 
When hooking up your Renogy system, the best way to add protection is by using fuses or circuit breakers. Fuses and circuit breakers are used to protect the wiring from getting too hot and also protect all devices connected in the system from catching fire or getting damaged if a short circuit occurs. They are not necessary for the system to run properly, but we always recommend using fuses or circuit breakers for safety purposes.

There are three different locations that we recommend installing fuses or breakers: first, between the charge controller and battery bank, second, between the charge controller and solar panels, and third would be between the battery bank and inverter.

To determine the fuse size needed between the charge controller and battery bank you simply match the amperage rating on the charge controller. For instance, if you have one of our 40Amp charge controllers, we would recommend using an 40Amp fuse.

6. Are the cables made of Tin or Copper?
 
The Tray Cables are stranded copper wire that are tin plated.
More questions about your off-grid power system? Learn more from Renogy Learning Center!


Downloads


52 Reviews